Host a static website on AWS
This blog post is part of a series called How this blog is made.
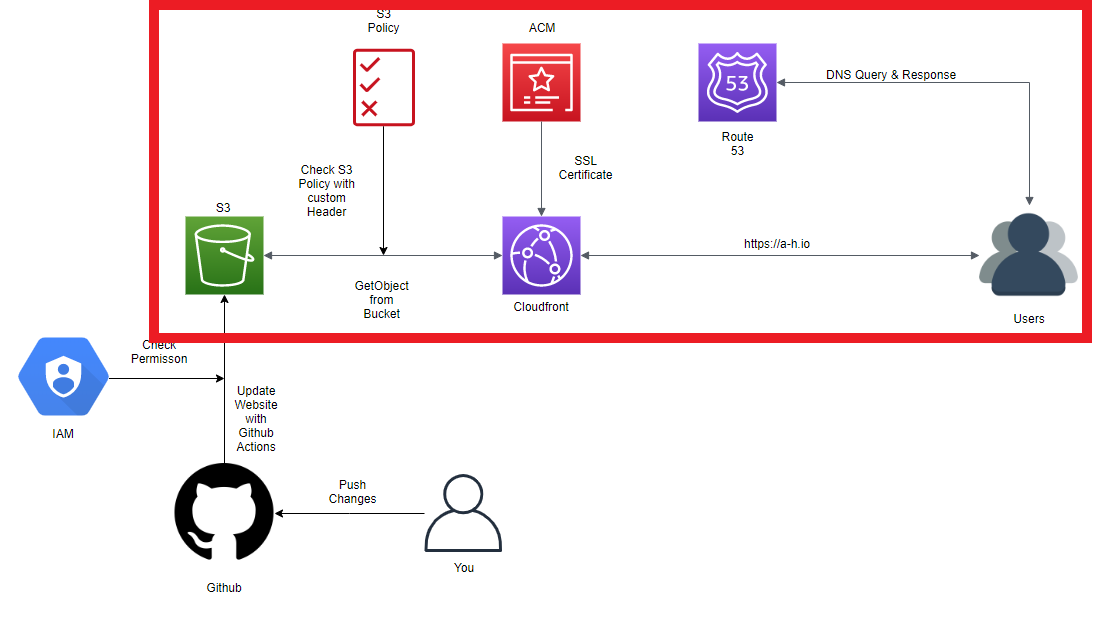
In this post we will make the Hugo website available for others on the internet. To get fast and worldwide distribution of the static website we will use Amazon S3, Cloudfront and Route 53. For security, we will add a S3 Bucket Policy and a new AWS User with restricted access for the Github Actions.
We will be focusing on this part of the diagram:
Amazon Simple Storage Service (Amazon S3)#
In this section we will create a bucket where the static website files will be saved.
- Go to your AWS Console and to Amazon S3.
- Create a new Bucket:
- Give it a name:
<Your-Bucket-Name>. - Choose a region:
<Your-Region>. - Uncheck
Block all public accessand acknowledge the warning. - Create your bucket.
- Give it a name:
- Open your new bucket and click
Upload:- Drag & Drop all the files in
<Your-Repository>/publicinto the new window. - Click
Upload.
- Drag & Drop all the files in
- Go to the
Propertiestab and here toStatic website hosting:- For Index document write:
index.html - For Error document write:
404.html - Save your changes.
- For Index document write:
- In the
Propertiestab you will also findTags. I like to tag all my resources for one project so here I go with theKey=projectandValue=a-h.io. Save your changes.
- Next we will give permissions to read the bucket. Go to the
Permissionstab and here toBucket Policy:- We will allow
"Effect": "Allow"everyone"Principal": "*"to read"Action": "s3:GetObjectthe content of your bucket"Resource": "arn:aws:s3:::<Your-Bucket-Name>/*"under the condition, that theirUser-Agentequals<some-key-we-define>. - Here we need a random key or password
<some-key-we-define>. One easy way to get a random key on linux is:
head /dev/urandom | tr -dc A-Za-z0-9 | head -c 48 ; echo ''- Your policy now looks like this:
{ "Version": "2012-10-17", "Statement": [ { "Sid": "AllowCloudfrontHeader", "Effect": "Allow", "Principal": "*", "Action": "s3:GetObject", "Resource": "arn:aws:s3:::<Your-Bucket-Name>/*", "Condition": { "StringEquals": { "aws:UserAgent": "<some-key-we-define>" } } } ] }- Add the policy in the text area and save. The key we defined will later be used by Cloudfront to identify the Cloudfront-Distribution, we will create, as the only service to access the bucket.
- We will allow
Now we have a S3 bucket for our static website hosting which can only be accessed with the right User-Agent header.
AWS Certificate Manager (ACM)#
To serve the website over a secure connection with HTTPS we have to use a SSL Certificate which we will create in this section.
- Go to your AWS Console and to ACM
- Change your region to
us-east-1. Only certificates in this region can be used by Cloudfront. - Request a certificate:
- Request a public certificate.
- Fill in your domain:
<Your-Domain>. If you like you can add subdomains likewww.<Your-Domain>too. - Choose a way to validate your request. If you are not sure which method is right for you, read the articles on
Learn more. - Tag your resource. I go with the
Key=projectandValue=a-h.io. - After the
Statusof your certificate changed toIssuedand theValidation statusof your domains toSuccess, you can use your certificate with Cloudfront.
Cloudfront#
Cloudfront will serve the website using the SSL Certificate we created and cache the static data of your website near the users at AWS Edge Locations.
- Go to your AWS Console and to Amazon S3.
- Create a distribution:
- Click
Create Distribution. - Choose
Web. - Origin Domain Name:
<Your-Bucket-Name>.s3-website.<Your-Region>.amazonaws.com. - Leave Origin Path empty and Orgin ID as it is.
- As Custom Header add:
Header Name=User-Agent.Value=<some-key-we-define>.
Viewer Protocol Policy=Redirect HTTP to HTTPS.Object Caching=Customize.Default TTL=1800.Compress Objects Automatically=Yes.Alternate Domain Names (CNAMEs): add in separate lines<Your-Domain>and optionalwww.<Your-Domain>.- Select
Custom SSL Certificateand choose your new certificate. - Click
Create Distribution.
- Click
- On you Cloudfront dashboard at
Distributionsyou can see your new distribution with an<CF-Distribution-ID>and a<CF-Domain-Name>. - Open your new Cloudfront distribution. On the tab
Generalyou can see your<CF-Distribution-ARN>. Go to the tabTagsand tag your resource. I go with theKey=projectandValue=a-h.io.
Now we have a Cloudfront distribution which directs traffic to your S3 bucket.
This Cloudfront distribution is the only service that knows your secret key <some-key-we-define> and can access your bucket with the static website.
You can test your permissions by opening <Your-Bucket-Name>.s3-website.<Your-Region>.amazonaws.com. Your request should be denied.
If you try <CF-Domain-Name> you can access your new website over the internet.
Route 53#
To reach our new Cloudfront distribution with our own domain <Your-Domain>, we will use the DNS service of Route 53 to point
<Your-Domain> to <CF-Domain-Name>.
- Go to your AWS Console and to Route 53.
- On the left side on
Hosted zonesand clickCreate Hosted Zone:- Domain Name:
<Your-Domain>. - Click
Create.
- Domain Name:
- Open your new hosted zone.
- Here you see four addresses at
Type=NSwho look likens-123.awsdns-321.com.. Copy all four addresses and put them at the DNS nameserver settings wherever you have registered your domain likeNamecheaporGoDaddy. It might take a while until these settings are updated (8h-24h). You can check your domain settings at https://centralops.net/co/NsLookup.aspx
Next create a Record Set:
- Click
Create Record Set. - Leave the
Nameblank. Type=A.Alias=Yes.Alias Target=<You-Cloudfront-Distribution>- Click
Create.
- Click
Optional for your
www.<Your-Domain>:- Click
Create Record Set. Name=www.Type=A.Alias=Yes.Alias Target=<You-Cloudfront-Distribution>- Click
Create.
- Click
Now <Your-Domain> will be routed to <CF-Domain-Name> and from here to <Your-Bucket-Name>.
